CENA DEMO: Run the example
In this section, you’re encouraged to run the simulation on your own machine and follow along. However, you can also simply stay on this webpage, as all the actions and reactions of the simulation are fully presented here.
If you wish to run the simulation then check out the setup section or skip it otherwise.
Setup
First of all get the source code from our GitHub Repository.
In order to build the application using the CENA libraries, you need
An x86_64 CPU, as we ship the binary only for that architecture at the moment
CMake 3.16 or higher
A C Compiler supporting C99 or newer
A C++ Compiler supporting C++17 or newer
GNU/Linux
On Linux hosts, everything should work out of the box, if you have installed a recent version of GCC, G++ and CMake via your system’s package manager.
Microsoft Windows
For Windows builds, only the Cygwin based toolchain is currently tested and evaluated.
Please make sure you have set up a working Cygwin environment before continuing.
You will require at least the following packages installed via the cygwin installer:
gdb, gcc, g++
cmake
make
Warning
Execute all commands from within the Cygwin terminal.
Quickstart
Inside the repository you’ll find a src folder that contains the example implementation that makes use of the CENA libraries. Along with the actual implementation (the .cpp files) there is a CMake project file - CMakeLists.txt
Perform the following commands to build the example:
cd /src/example_usage/
mkdir build && cd build
cmake ..
make
You now have built your first application with the CENA as a library! The generated program is placed in the build folder: example_mtp_controlengine.
Finally run the app in your terminal!
./example_mtp_controlengine
Fill and drain the tanks
If everything is up and running you should have received the following log in your terminal.
INFO Running the control engine
That means the CENA is ready to process instructions to control the valves of our tank!
To receive those instructions it opens an OPC UA server with the predefined properties of the PEA saved in the MTP file.
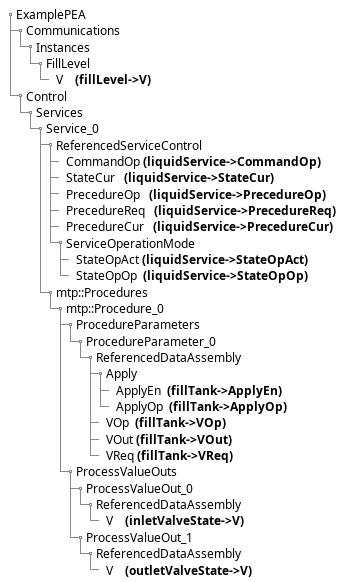
Now we need to connect to this server using an OPC UA client, like UA Expert and connect to opc.tcp://127.0.0.1:4840. You should see our “ExamplePEA” in the address space.
There the CENA hosts all the relevant properties of the PEA. By manipulating those values through our OPC UA client, the CENA based application will react accordingly with the implemented the business logic regarding the defined MTP standard.
In our case that would be to open or close the valves when the procedure is started considering the fill mode.
Tip
If you are using UA Expert, there is an UA template file (examplePEA.uap) in the same directory as the cpp source code. This automatically connects to the specified ip address and subscribes the relevant attributes to control our tank module.
Next, subscribe to these values:

The tank fill level should be 0%.
Next we want to fill the tank. The required steps may seem a bit laborious, but all of them are necessary to fulfill the defined MTP standard.
In a real process plant, the POL would abstract all of these sub-steps, leaving only a single button to fill the tank. However, we’ll manually perform each step using our OPC UA client and provide a brief explanation for each one.
- Set liquidService->StateOpOp to true
liquidService->StateOpAct should become true
liquidService->StateCur should become 16 (IDLE)
By default the PEA is controlled internally, this command tells the PEA that the liquidService shall be controlled by us (the operator).
- Set liquidService->ProcedureOp to “1”
fillTank->ProcedureReq will become 1
This requests the procedure that should be executed. In our case we only have one that fills and drains the tank.
- Set fillTank->VOp to true
fillTank->VReq will be true
This is a parameter of our fill tank procedure. True indicates that we want to fill the tank instead of draining.
- Set fillTank->ApplyOp to true
fillTank->VOut will be become true as requested; the info-callback should be printed on the command line
This now applies the procedure parameter and it is ready to use for our procedure.
- Set liquidService->CommandOp to “4” (START)
fillTank->ApplyEn should become false
fillTank->VOut should become true
liquidService->StateCur should become 64 (EXECUTING)
The tank level should rise to 100% in ~20 seconds
By doing this, we send the START command to the PEA, which then executes the requested procedure with the specified parameters—in our case, filling the tank.
- The tank level will start to rise
when 100% are reached, liquidService->StateCur should become 131072 (COMPLETED)
- Set liquidService->CommandOp to “2” (RESET)
liquidService->StateCur should become 16 (IDLE) (its going through RESETTING, but its probably so fast you won’t see that)
After a procedure is completed it needs to be reset to go back in the IDLE state.
Note
Now you can try to drain the tank on your own or follow along the remaining steps together.
- Set fillTank->VOp to false
fillTank->VReq will be false
- Set fillTank->ApplyOp to true
fillTank->VOut will be become false as requested
- Set liquidService->CommandOp to “4” (START)
The tank level should decrease
Hit Ctrl+C to stop the example once you get bored.
Summary
In this quick example we have demonstrated how the CENA can control a PEA module and expose it’s functionality to the outside, so the POL (or in our case the OPC UA client) can start its services.
If you are still interested to see what is actually happening under the hood, what the code of this example application looks like and how it interacts with the CENA framework, then check out our detailed documentation.
Be aware that this documentation is aimed at developers that have a decent coding background. Some of the already covered aspects will be presented there again in more detail.